I am working on a school art show for the 5th of this month, then into finals. It has been a bit since I posted, and may be a bit more till I do again. I haven't forgotten my blog, I am just getting 6 pieces ready to be shown this week. I'll be back later, please check in again soon.
Alice
Monday, December 2, 2013
Monday, November 18, 2013
Metal Tins..
Last week at my (sort of) local dollar store, I spotted this tin. I loved the size of it immediately and since it was only $5.00 and had chocolate inside, I bought it. I have an inner letch for metal tins, and use them to store art supplies. In fact, I will usually buy something I don't even need if the tin is the right size for my treasures. This one is a great size and I am posting so that if you have the same love of storage containers, you can go hunt one down in a Christmas candy display somewhere.

Being filled with chocolate was an issue. I love it, but will often eat all of it. I actually don't need all of it, but what can you do? There it is. I decided to just get it over with fast, and ate 5 pieces on the drive home! My drive home is 30 miles, don't judge me too harshly. It kept me awake..

So, now I will use it for a few things till I decide where it fits into my storage needs. It does work well for brushes. My studio is in the boonies, dust is an issue and this will keep them dust free.

It is a very nice size for watercolor tubes, also. I have more than will fit into it; they're in a large cookie tin of their own, but I use very few colors anymore. Hmm, this will take some time.

Pictured here are a few of my favorites. Clockwise from the top, a mint tin, full of tiny drill bits for my Dremel tool, a Conte tin full of Conte sticks, a tin printed with apples for my calligraphy pens and above that to the left, a tin for Rapidograph pen parts. As you can see, my new tin will stack together nicely with the others.

Happy creating!
Saturday, November 16, 2013
Cigar Box Pochade
I bought a used cigar box on ebay to make a tiny field kit. There are some blogs and photos of this idea out there in internet land and as soon as I saw some of them, I wanted to try it. Hopefully, this will serve as a useful travel tool.
Inside the box were four strips of a lightweight wood around the perimeter of the box. These served to keep the cigars tightly packed and gave the lid a friction fit. Pretty nifty way to keep from having to have a latch to hold it closed. They weren't glued or fastened in, and lifted out easily. They gave me pieces of wood to help make my dividers.
I glued one long piece of wood along the front of the inside of the box, keeping it's width. This gave the lid something to hold it closed. The other long piece of wood was narrowed in width and glued in place to create a space for pencils and a brush.
Using thumbtacks and ribbon, I made supports to keep paper and a heavy cardboard paper-support behind. Pretty low tech. Later, when I find just the right thing for a handle, I will attach it with small screws. The wood of the box is lightweight and thin. It won't take anything heavy being screwed into it. Depending on how it travels, I may look for a clasp of some kind and a hinge that will enable me to keep the lid at the angle I want to work at. In the meantime, my cheap, low-tech box is ready to stash in my car and use.

The box

My palette, pretty great idea somebody came up with and I borrowed! Notice the paper clipped to the lid. It's a tiny easel..

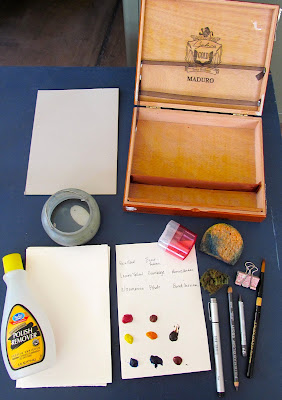
All of the supplies I will need: a natural sponge, a synthetic one, paper, a collapsible water cup, pencil sharpener, water soluble graphite pencil, non-water soluble pencil, permanent ink drawing pen, one travel brush, one piece of heavy cardboard to attach paper to with a clip, and a flat, plastic water container.

How it all fits inside. I have hunted all over the place for a flat water bottle with a narrow neck and opened my bathroom cupboard and there, shining on the shelf, a nearly empty bottle of nail polish remover! The perfect size, there all the time.
Thursday, November 14, 2013
Off of the Loom!
Today I finally got my weaving cut off of the loom. Exciting day!
Color Study in Fibers, 30" x 67"

Three more colors of weft to go, nearly ready to come off of the loom.

Along the right edge you can see the colors of the warp, along the bottom of the picture you can see the colors of fabric used for the weft. Not one square is exactly the same hue as another, although many are in the same color families.

Here the colors of the warp are along the left edge of the picture, the weft is along the bottom edge.

I will leave the fabric strips at the edge of the piece. I still need to decide how to handle the top and bottom edges and finish them, then figure out how I am going to hang it. The has been such a fun project.
Wednesday, November 13, 2013
Watercolors in the Field
I usually take art supplies along with me in my car. However, I always have a different set-up with me and the more stuff I take, the less likely I am to actually take the time to sketch or paint. I have used different bags, boxes and cases. I have made tiny paint boxes, I have bought tiny paint boxes and I have used half and full pans in them, trying to find the perfect paint palette to haul along with me away from home. I buy watercolor paper in blocks, spiral bound books and even a large watercolor Moleskine book to put into my assorted bags. Travel paint brushes, water cups, paper towel packs; you name it, I've bought or tried to make it. Here is what I could lay my hands on quickly in my studio:


I have enough stuff for two or three field kits. Let's face it, who can resist tiny little art supplies? Certainly not me! Even though I have the perfect tiny little paint box/palette, when I see a travel palette in an art supply store, I have to work to resist the urge to buy it. I think the attraction is this; if I buy the perfect tool or material I will be a better artist! I will be out in the field, painting up a storm nearly every single day. The truth of the matter is this, new supplies don't make me a better artist, hard work does. No shortcuts. Dang it.
So, I am putting only what will fit into a wooden cigar box, including paper, with the hope that I will keep it in my car and use it just because it is cute and simple. Here are some links to fun ideas for travel watercolor kits. It's fun to see what other people use, kind of artist voyerism.
The best link is the last link. Be sure to check out her video for fantastic, really fantastic ideas for travel palettes. It makes my little pile of toys look so overdone. I LOVE the ideas in her video.
Enjoy, and happy painting. I'd love to know what you travel with.
Monday, November 11, 2013
More Wanderings..
In the Jemez Mountains in Northern New Mexico is an amazing caldera, or volcanic crater. Around this caldera, throughout the mountain range are huge rocks standing alone among the trees or on the edges of meadows. I love this one. It is called Tea Kettle Rock; the name alone enchants me. It is bigger than it looks, I included figures in the photo to put it into perspective.


From the North side. I think of it as the front..

The back of it, notice the little cave in the lower right hand corner of the photo. Fun place!
Thursday, November 7, 2013
Vincent Van Gogh, in 3-D!
I am working on a whimsical sculpture. I thought it would be fun to make a statue of one of my favorite painters, Vincent Van Gogh, and then paint him like he painted himself. I posted pictures of the beginning of the project a few posts ago, here's the link: http://whatercolorit.blogspot.com/2013/10/chickens-with-their-heads-cut-off-do.html
Well, Vincent has proven to be more difficult than I thought he would. I'm making him out of papier mache. I began sanding him down yesterday in preparation for a coat of gesso, an acyrlic primer and ran into problems. So, I'll add more paper to his "holes" and hopefully get him primed and ready to paint- fast. I'm running out of semester!


Well, Vincent has proven to be more difficult than I thought he would. I'm making him out of papier mache. I began sanding him down yesterday in preparation for a coat of gesso, an acyrlic primer and ran into problems. So, I'll add more paper to his "holes" and hopefully get him primed and ready to paint- fast. I'm running out of semester!

In self portraits, Vincent always painted himself as gaunt and solemn. I've made his head large in proportion to his body, which is elongated and thin. Vincent often distorted things in his paintings, so this is my way of nodding to that feature of some of his work.

I've used newspaper dipped in a flour and water mixture for most of this piece. The parts I wanted to mold with my fingers were done with a papier mache product I bought at the local art store.
This is probably the painting I will use as my reference for the skin colors:

Hopefully, this won't be as troublesome to paint as it was to shape.
Wednesday, November 6, 2013
The Weaving Continues..
As the weaving progresses I am getting very excited about the color combinations I am getting. I have used red, blue and yellow so far. Each has made some nice color combinations with the warp colors.


You can see the colors of the cloth strips I'm weaving with at the lower right corner of the photo.
The colors of the warp yarns are along the upper right edge of the rug.

Here are the red, yellow and orange warp yarn sections after weaving them with the red, blue and yellow.

Above are the yellow, green and turquoise warp yarns when mixed with red, blue and yellow.
Tomorrow I will begin to add a strip of black for contrast and design. If it looks wrong, I'll take it out and try red/violet strips next. I'm loving this project!

Monday, November 4, 2013
Weaving
I am taking a fibers class this semester. I'm over half way through the term and finally have begun to weave on my piece. Dressing, or getting the loom ready for the actual weaving process, is a time consuming job. Now that I'm actually weaving, this will go fairly fast.
The project I'm doing is a color study. As a painter, color has been very important to me. I've spent countless hours mixing colors and learning how to make the ones I need when I need them. Mixing color in fibers is a totally new and different process than in paint. I wove a scarf a few weeks ago out of light green, dark green and dark violet. They affected each other in ways I didn't expect or plan. I needed to get a better understanding of how to get good color combinations in my fiber projects, thus this color study I'm doing now.


The project I'm doing is a color study. As a painter, color has been very important to me. I've spent countless hours mixing colors and learning how to make the ones I need when I need them. Mixing color in fibers is a totally new and different process than in paint. I wove a scarf a few weeks ago out of light green, dark green and dark violet. They affected each other in ways I didn't expect or plan. I needed to get a better understanding of how to get good color combinations in my fiber projects, thus this color study I'm doing now.

Scarf, Rayon Yarn
I chose vibrant colors for the warp, or the yarns wound onto the loom. For the weft, or the fibers that will actually be woven into the piece I am using the same colors as the warp, plus some others that I hope will create interesting contrasts with the warp, such as forest green and a true blue. I'll use some black for design interest. My theory/hope is that as each new color is introduced in the weft (strips of fabric, in this case), it will interact differently with each color of the warp, causing each square of color to be different from every other color.

Winding the yarn to measure it out in 4.5 yard lengths and to count out 120 yarns in each color.

The hanks of yarn, waiting to begin the dressing process.

The front of the loom during the tying on process. The yarns, all 720 of them have been put into the reed, or the part you can see the yarns going through, then into the heddles, or the wires that will separate them and move up and down to make a pattern as the weft is thrown through in the weaving process.

The warp is now all tied on and ready to be used.

The back of the loom, where the long yarn warps are wound on and ready to be pulled through the loom as the weaving progresses. The treadles, or foot pedals are visible under the colors.

View from the back/top. You can see four boards going horizontally across the picture; these are the harnesses. Each one is tied to a treadle under the loom. When each treadle has pressure applied by the weaver's foot, it will lift a different harness, helping to create a pattern in the weaving.
I will post more as this goes along.
Wednesday, October 23, 2013
Bronze Sculpture
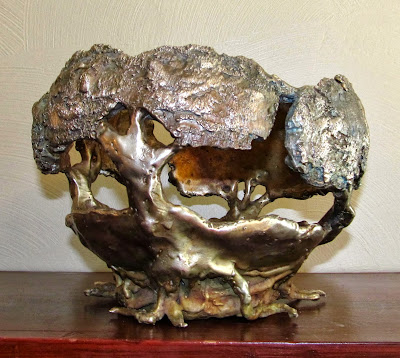
All of my life I have loved looking at photos of ancient bronze sculptures. I've always wondered how the process works and how hard/scary it is to pour bronze into a mold. Well, I took a sculpture class last Fall and began a very fascinating process with my own bronze sculpture. Here are some photos of the process and the (finally) finished piece.
We made our sculptures first out of wax. After the wax piece is finished, a pouring spout or base must be attached with sprues or vents leading from it to the sculpture to allow air to escape during the pour. After these are in place, the whole thing is dipped into a slurry solution, then into fine sand to create a crust that can be fired into a rigid shell. The molten bronze will be poured into that shell.


We made our sculptures first out of wax. After the wax piece is finished, a pouring spout or base must be attached with sprues or vents leading from it to the sculpture to allow air to escape during the pour. After these are in place, the whole thing is dipped into a slurry solution, then into fine sand to create a crust that can be fired into a rigid shell. The molten bronze will be poured into that shell.

The wax filled shell being placed into a gas-fired furnace. The wax will be burned out, leaving the shell hollow.

The shell, cooling down after the burn.

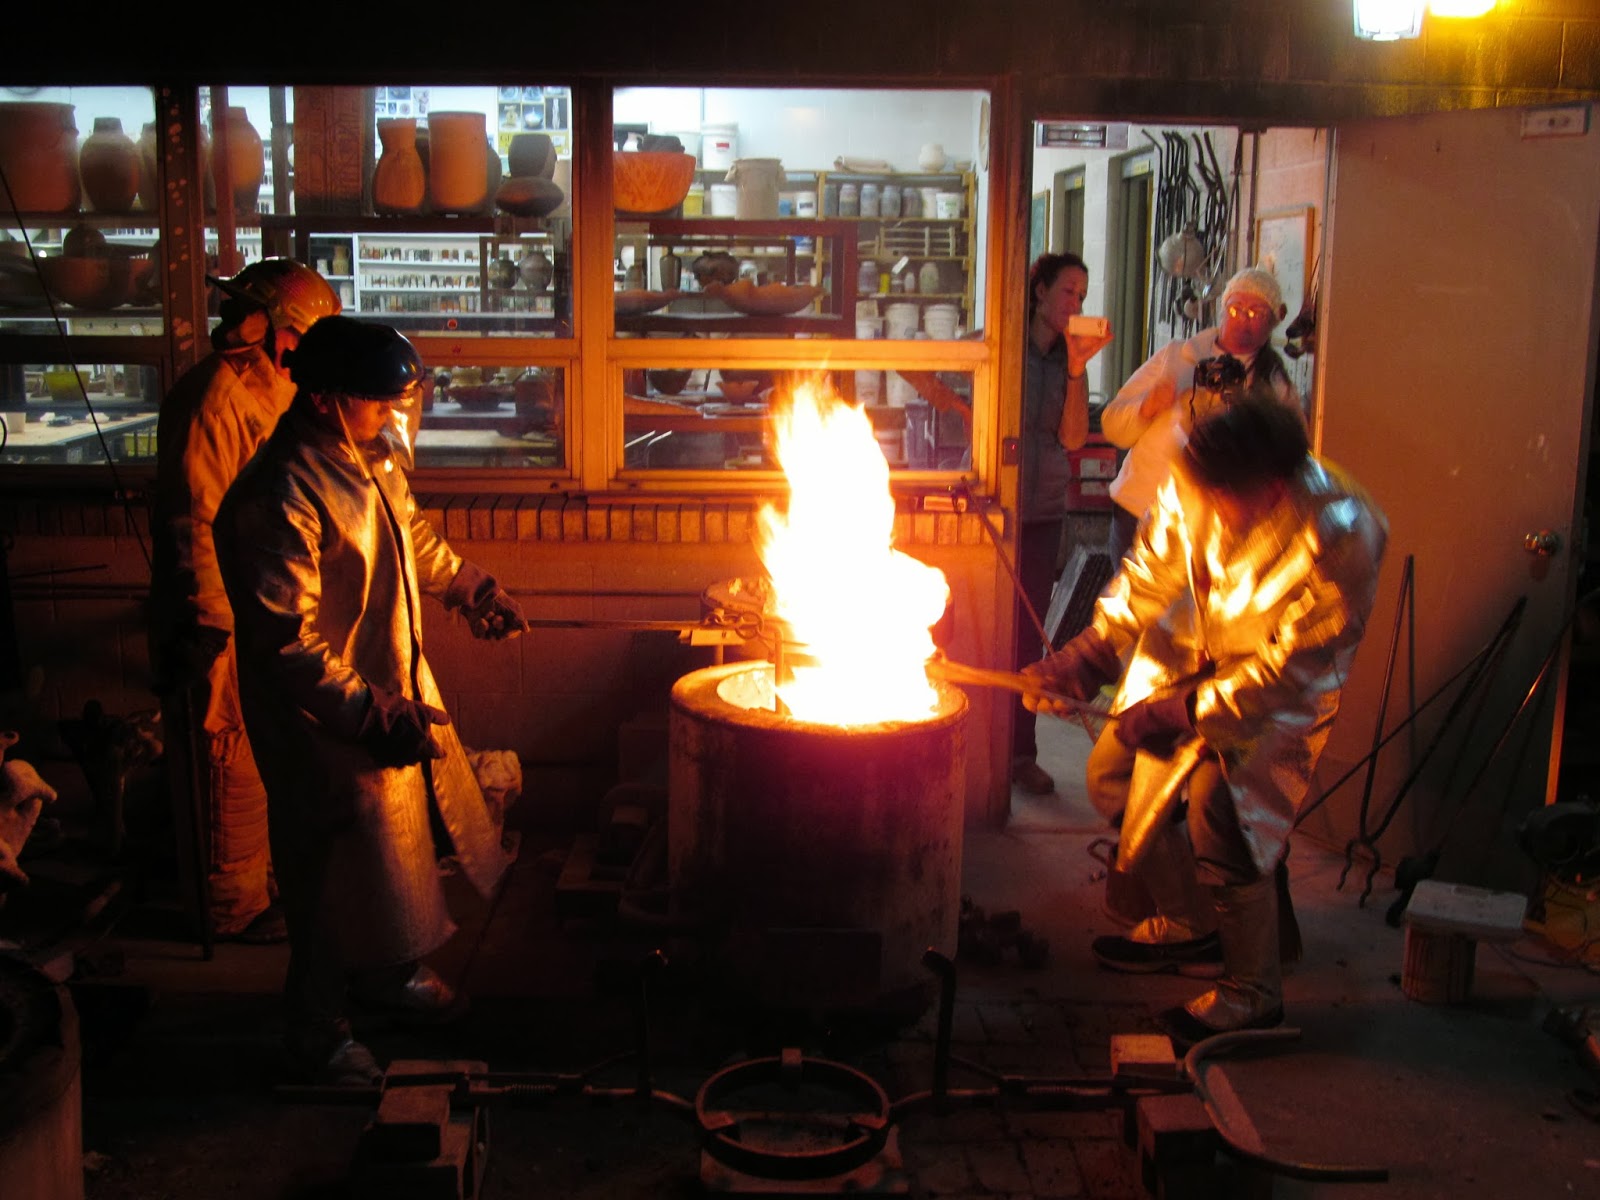
How the furnace looks during the burn; the wax makes a great, big, smoky fire! Very fun.

The next day, we lit the bronze furnace, again gas fueled and began to melt the bronze. Here we have ingots and scrap from a previous pour.

The shells are placed open side up into a steel drum support, then aluminum foil is put over the opening to avoid molten metal splash as the pour first begins.

Here is my piece, ready to be poured.

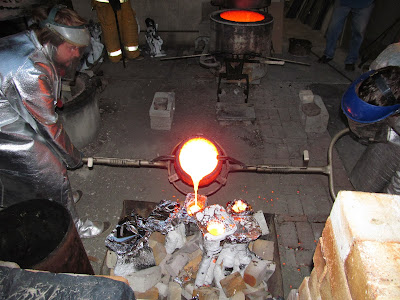
We poured for hours. I included some photos I took after dark, as they are more dramatic! There is a beauty and thrill in this process.

Pouring...

and pouring..
The crucible being put back into the furnace to be reheated and refilled for the next group of molds.

The molds, filled and cooling off.

After they are cooled, the hard shell must be chiseled off. It is chalky and difficult to remove from small nooks and crannies and takes a lot of time to clean up. The sprues and pouring spout also have to be cut off and the places where they were attached ground down and smoothed off. This is the most difficult and time consuming part of the process.

Here, the ceramic shell is finally gone, and the piece is in the process of polishing and buffing for the desired finish. A metal wire wheel was used to bring the bronze to a clean, shiny finish.

After it is polished and cleaned up and ready to go, a chemical patina is added by first heating the piece with a propane torch until it reaches 300 degrees. Then, chemicals are sprayed on to add a colored patina to the piece. For more information about this process, see: http://www.sciencecompany.com/Patina-Formulas-for-Brass-Bronze-and-Copper-W160.aspx#2

After the patina has been added, use a wire wheel to remove some of it in the high spots to allow the bronze color to show through.

After the finish is complete, a coat of paste wax is added for shine and preservation.

This sculpture weighs nearly 18 pounds. I will make a base, and be ready to display it. Or use it as a weapon should the need ever arise!!
The Creative Process
During a class discussion some time ago, the instructor asked those of us in the class how we got the impetus to make the assignments we turned in that day. What inspired us to begin? This was an important question to me and has continued to be so since that day. I hadn't been aware of any "creative process" happening in my life. However, there were truths to be understood in the concept and I've thought quite a bit about it since.

To me, the desire to create things is part of who I am, but I don't believe that I'm exclusive in this. I would guess that most people have creative urges, I'm just lucky enough to know what direction mine take and to have had the chance to rub elbows with others who clearly knew and understood a creative process. It is a drive that exists inside of my spirit that is powered by energy. This force builds up until it HAS to be used in some creative way.
1. Finding an idea:
Ideas can't be forced. They have to be given something to grow from; a trip to a gallery, researching what others have done and how they've done it, or a walk in a beautiful place. Sometimes they happen in a group setting when others are excited and talking about new ideas. Sometimes, though, they happen in my sleep and I wake up with an idea, complete and bursting to take form! They take time and working on deadlines can slow down the process. I can see why some artists don't want to work on commission or try to please a gallery. It can take the pleasure of the discovery away.
2. Allowing the idea to ripen:
Time alone to ponder and plan is essential to a successful outcome. I have set up places around my home that give me peace and solitude and I spend time in them as often as I can. I am able to be open to the birth of an idea and then to figure out how to solve the problems that come with every new inspiration. What style will it be in? What colors best represent what I want to portray? What medium? Finally, I come to a point where I know what I want and am ready to begin the work.
3. Work, with total focus:
Once this peaceful, introspective process is through, it is time for action. Sketches are done to see how the composition will work, sometimes research is necessary to feel confident in the details and the materials need prepared, including the final drawing on the paper or board. There is so much work to be done to prepare. The idea that somehow one just picks up the brush and a masterpiece flows out of it is from the movies.
Once the drawing is in place, there's no holding the creative force back. I paint for hours without realizing how much time is passing. If the phone rings, I have to be careful not to be rude to my caller for interrupting me. When the room grows dark and I have trouble seeing, I realize I'm hungry! How did the day get away from me? I visit with my husband over supper, but pretty soon I'm slipping back to the studio to look at my progress. I think, "If I were to..." and pick up my brush and pretty soon I'm back into the painting again. (I'm lucky, I am married to a man who goes through the same creative cycles and doesn't take it personally! Chances are, he's involved in a project of his own.) If I have to leave the piece for a few days, it is very difficult to start again. It takes extra effort to get that energy and focus back.
4. Be open to whatever direction the work needs to go:
Problems arise during the work phase that have to be solved. If I don't step back and let the answer sift through on it's own, I know I will ruin the painting. This is something that often has to be allowed to brew. Taking a walk or calling one of the kids to visit is usually enough time to solve the puzzle and back to work I go.
5. Know how to begin all over again:
Knowing when to stop is one of the most important steps for me. If the piece turns out like I had hoped, I am euphoric for days. I am in love with it, it's the best thing I've ever done; I could never part with it. I love it like my own child. However, when I haven't met the mark, I am upset; I obviously have no business wasting so much time and money on something I will never master. It is very hard to begin again and takes time to build up the energy to develop a new idea. I hate being subject to such a thing, but I am. It is so tied up with my emotional life. It is part of myself. Allowing myself a short period of time to get back on emotional normal again is essential. Too long, though and it gets harder to get back to work. I've come to know when to begin again. Most times just a day or so is enough, but sometimes as long as a week or two. For me, any longer than that and I begin to develop a real block.
For some reason, knowing my own process has been important in my artistic development. I haven't had the time to puzzle it out, but I know how to keep myself active and growing. That's enough for now.

One of my quiet places..
Wednesday, October 9, 2013
Receiving and Giving Critiques
Terrific post on Daniel Edmondson's blog about critiquing the work of others and receiving it for ourselves as well. This is well worth watching. It's short and to the point with information that is very helpful and well thought out.
http://www.oilpaintingworkshop.com/AR/23.htm
http://www.oilpaintingworkshop.com/AR/23.htm
Monday, October 7, 2013
Chickens with their heads cut off DO run around...
And I am running around just like one! I do have a painting in the layout stages, a sculpture in process and a weaving being dressed onto a loom currently. I am keeping up with my computers class, my art processes class and my art history class. I'm even keeping up with the dishes and laundry. . . ish. However, so far I'm not ahead of the game either. It's a long term race, going to school and being a grownup. I'm loving on the grandkids as often as I get the chance to do and spending as much time with my beautiful man as possible. What I am NOT doing is spending as much time exploring my painting as it needs.
No matter what you are involved in, there is always something one can feel guilty about. The trick is to look at what IS getting done and not what is NOT getting done. Some days I do better at this than others. Having just turned in a full day of assignments from online classes at 11:00pm I am feeling like I need a reminder that I am moving ahead.
Here is the sculpture beginning:

Armature out of whatever wire I could find, this is an experiment after all!

Fleshing the figure out with foil..

He looks like a newspaper mummy at this point! Papier Mache is a slow process, but I have fun plans for this piece. I'll post more when I finish it.
Here is the beginning process of dressing a loom. I am making a rug which will be a color study in fiber.

Winding the warp, or the yarns that run lengthwise and are the foundation of the weaving.

These yarns are being strung through the "reed" of the loom in preparation for being threaded into the heddles, or the section of the loom that moves, allowing a pattern to emerge in the finished piece. I'll post more about it later this week.
I have gotten work done and am working like crazy to get some finished pieces turned out. I can do this!
Subscribe to:
Posts (Atom)