Wednesday, October 23, 2013

Bronze Sculpture

All of my life I have loved looking at photos of ancient bronze sculptures.  I've always wondered how the process works and how hard/scary it is to pour bronze into a mold.  Well, I took a sculpture class last Fall and began a very fascinating process with my own bronze sculpture.  Here are some photos of the process and the (finally) finished piece.

We made our sculptures first out of wax.  After the wax piece is finished, a pouring spout or base must be attached with sprues or vents leading from it to the sculpture to allow air to escape during the pour.  After these are in place, the whole thing is dipped into a slurry solution, then into fine sand to create a crust that can be fired into a rigid shell.  The molten bronze will be poured into that shell.


The wax filled shell being placed into a gas-fired furnace.  The wax will be burned out, leaving the shell hollow.


The shell, cooling down after the burn.  


How the furnace looks during the burn; the wax makes a great, big, smoky fire!  Very fun.


The next day, we lit the bronze furnace, again gas fueled and began to melt the bronze.  Here we have ingots and scrap from a previous pour.


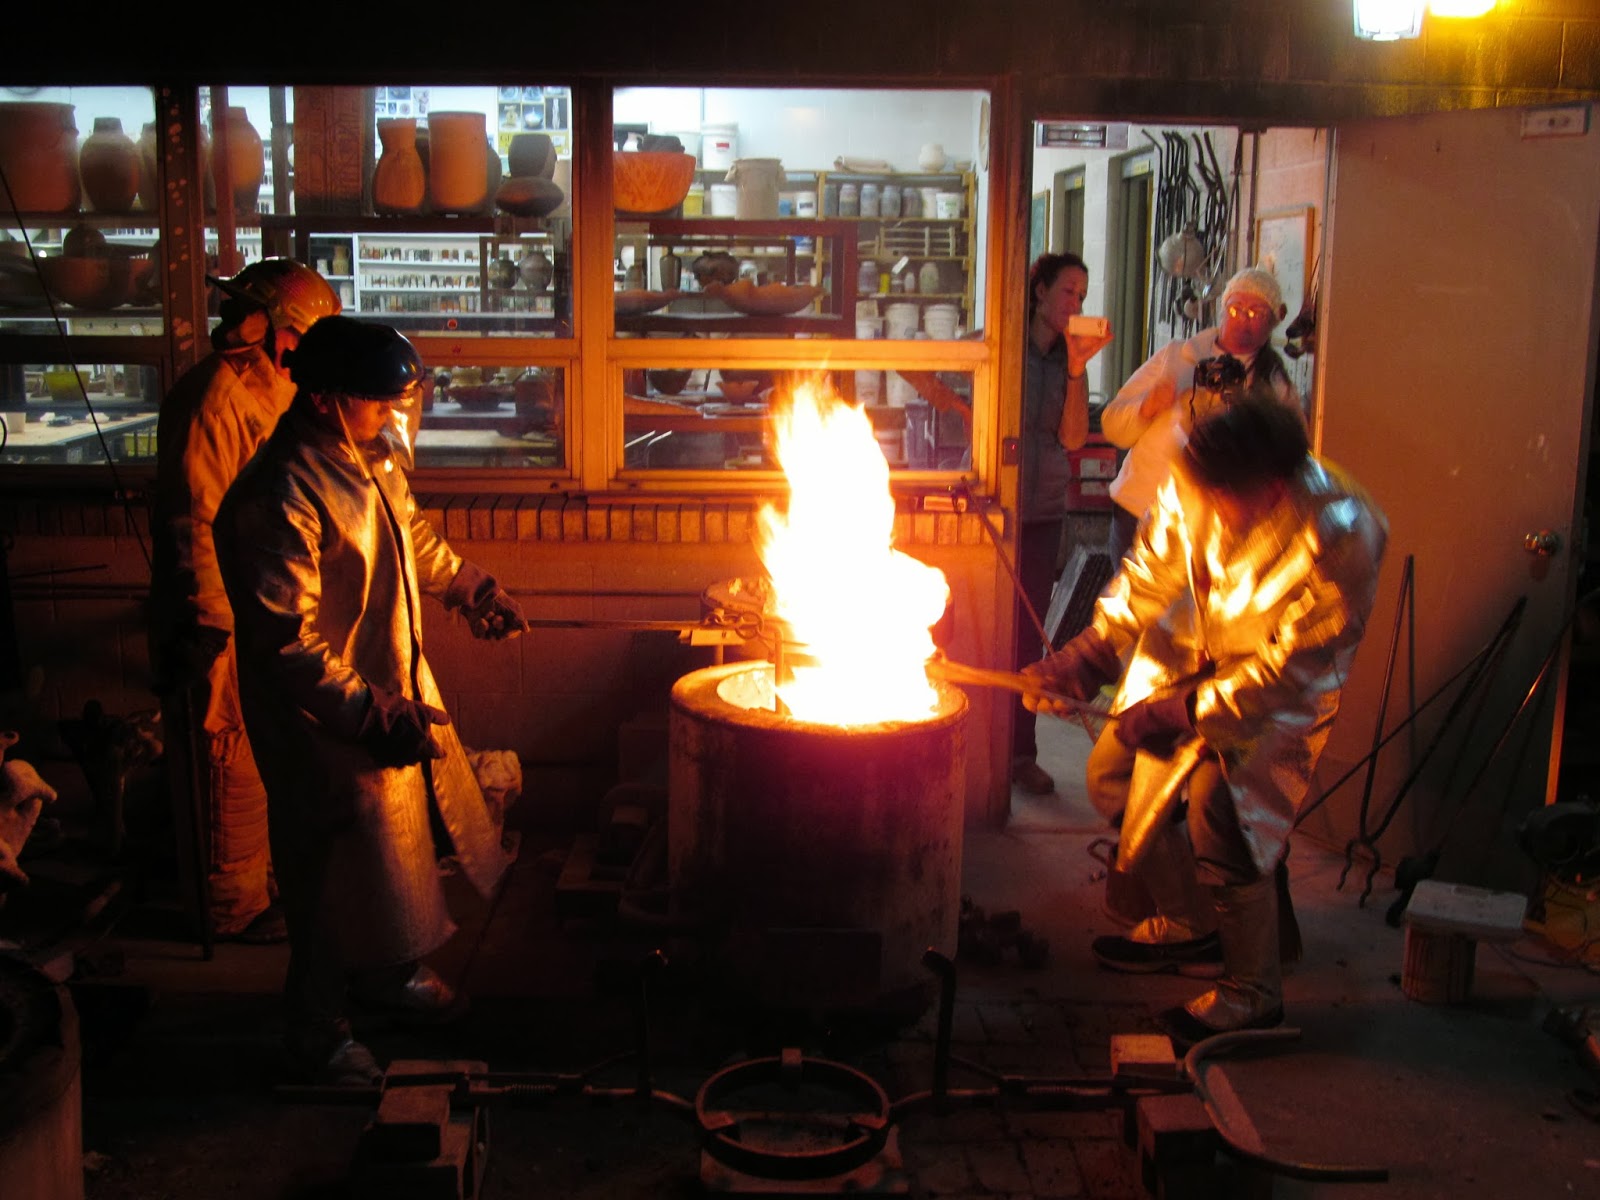
The shells are placed open side up into a steel drum support, then aluminum foil is put over the opening to avoid molten metal splash as the pour first begins.


Here is my piece, ready to be poured.


We poured for hours.  I included some photos I took after dark, as they are more dramatic!  There is a beauty and thrill in this process.


Pouring...


and pouring..


The crucible being put back into the furnace to be reheated and refilled for the next group of molds.


The molds, filled and cooling off.


After they are cooled, the hard shell must be chiseled off.  It is chalky and difficult to remove from small nooks and crannies and takes a lot of time to clean up.  The sprues and pouring spout also have to be cut off and the places where they were attached ground down and smoothed off.  This is the most difficult and time consuming part of the process.


Here, the ceramic shell is finally gone, and the piece is in the process of polishing and buffing for the desired finish.  A metal wire wheel was used to bring the bronze to a clean, shiny finish.


After it is polished and cleaned up and ready to go, a chemical patina is added by first heating the piece with a propane torch until it reaches 300 degrees.  Then, chemicals are sprayed on to add a colored patina to the piece.  For more information about this process, see: http://www.sciencecompany.com/Patina-Formulas-for-Brass-Bronze-and-Copper-W160.aspx#2


After the patina has been added, use a wire wheel to remove some of it in the high spots to allow the bronze color to show through.  


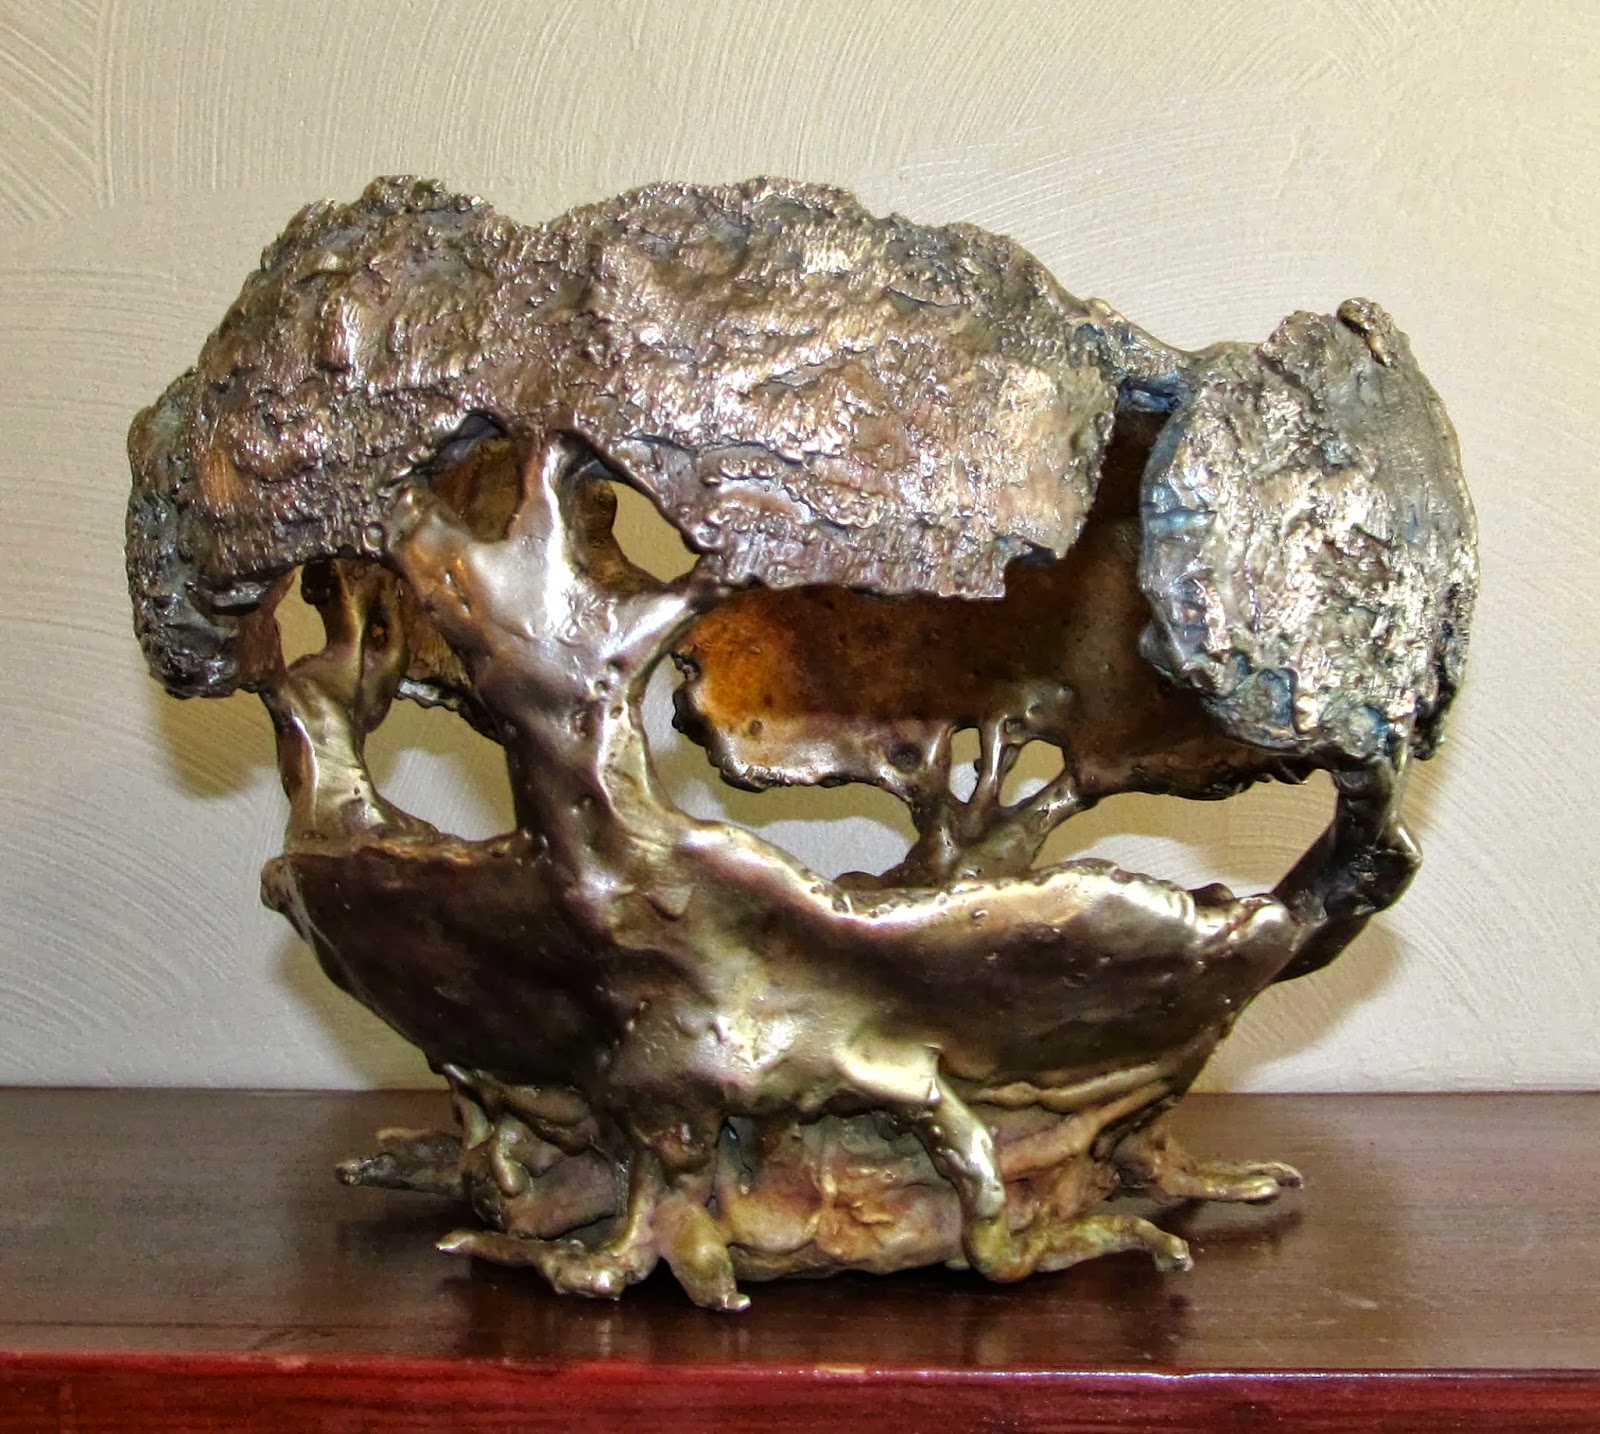
After the finish is complete, a coat of paste wax is added for shine and preservation. 


This sculpture weighs nearly 18 pounds.  I will make a base, and be ready to display it.  Or use it as a weapon should the need ever arise!!  

The Creative Process

During a class discussion some time ago, the instructor asked those of us in the class how we got the impetus to make the assignments we turned in that day.  What inspired us to begin?  This was an important question to me and has continued to be so since that day.  I hadn't been aware of any "creative process" happening in my life.  However, there were truths to be understood in the concept and I've thought quite a bit about it since.

To me, the desire to create things is part of who I am, but I don't believe that I'm exclusive in this.  I would guess that most people have creative urges, I'm just lucky enough to know what direction mine take and to have had the chance to rub elbows with others who clearly knew and understood a creative process.  It is a drive that exists inside of my spirit that is powered by energy.  This force builds up until it HAS to be used in some creative way.  

1.  Finding an idea:
Ideas can't be forced.  They have to be given something to grow from; a trip to a gallery, researching what others have done and how they've done it, or a walk in a beautiful place.  Sometimes they happen in a group setting when others are excited and talking about new ideas.  Sometimes, though, they happen in my sleep and I wake up with an idea, complete and bursting to take form!  They take time and working on deadlines can slow down the process.  I can see why some artists don't want to work on commission or try to please a gallery.  It can take the pleasure of the discovery away.  

2. Allowing the idea to ripen:
Time alone to ponder and plan is essential to a successful outcome.  I have set up places around my home that give me peace and solitude and I spend time in them as often as I can.  I am able to be open to the birth of an idea and then to figure out how to solve the problems that come with every new inspiration.  What style will it be in?  What colors best represent what I want to portray?  What medium?  Finally, I come to a point where I know what I want and am ready to begin the work.

3. Work, with total focus:
Once this peaceful, introspective process is through, it is time for action.  Sketches are done to see how  the composition will work, sometimes research is necessary to feel confident in the details and the materials need prepared, including the final drawing on the paper or board. There is so much work to be done to prepare.  The idea that somehow one just picks up the brush and a masterpiece flows out of it is from the movies.

Once the drawing is in place, there's no holding the creative force back.  I paint for hours without realizing how much time is passing.  If the phone rings, I have to be careful not to be rude to my caller for interrupting me.  When the room grows dark and I have trouble seeing, I realize I'm hungry!  How did the day get away from me? I visit with my husband over supper, but pretty soon I'm slipping back to the studio to look at my progress.  I think, "If I were to..." and pick up my brush and pretty soon I'm back into the painting again.  (I'm lucky, I am married to a man who goes through the same creative cycles and doesn't take it personally! Chances are, he's involved in a project of his own.) If I have to leave the piece for a few days, it is very difficult to start again.  It takes extra effort to get that energy and focus back. 

4. Be open to whatever direction the work needs to go:  
Problems arise during the work phase that have to be solved.  If I don't step back and let the answer sift through on it's own, I know I will ruin the painting.  This is something that often has to be allowed to brew.  Taking a walk or calling one of the kids to visit is usually enough time to solve the puzzle and back to work I go.  

5. Know how to begin all over again:
Knowing when to stop is one of the most important steps for me.  If the piece turns out like I had hoped, I am euphoric for days.  I am in love with it, it's the best thing I've ever done; I could never part with it.  I love it like my own child.  However, when I haven't met the mark, I am upset; I obviously have no business wasting so much time and money on something I will never master.  It is very hard to begin again and takes time to build up the energy to develop a new idea.  I hate being subject to such a thing, but I am.  It is so tied up with my emotional life.  It is part of myself.  Allowing myself a short period of time to get back on emotional normal again is essential.  Too long, though and it gets harder to get back to work.  I've come to know when to begin again.  Most times just a day or so is enough, but sometimes as long as a week or two.  For me, any longer than that and I begin to develop a real block.  

For some reason, knowing my own process has been important in my artistic development.  I haven't had the time to puzzle it out, but I know how to keep myself active and growing.  That's enough for now.  

One of my quiet places..

Wednesday, October 9, 2013

Receiving and Giving Critiques

Terrific post on Daniel Edmondson's blog about critiquing the work of others and receiving it for ourselves as well.  This is well worth watching.  It's short and to the point with information that is very helpful and well thought out.

http://www.oilpaintingworkshop.com/AR/23.htm

Monday, October 7, 2013

Chickens with their heads cut off DO run around...

And I am running around just like one!  I do have a painting in the layout stages, a sculpture in process and a weaving being dressed onto a loom currently.  I am keeping up with my computers class, my art processes class and my art history class.  I'm even keeping up with the dishes and laundry. . . ish.  However, so far I'm not ahead of the game either.  It's a long term race, going to school and being a grownup.  I'm loving on the grandkids as often as I get the chance to do and spending as much time with my beautiful man as possible.  What I am NOT doing is spending as much time exploring my painting as it needs.

No matter what you are involved in, there is always something one can feel guilty about.  The trick is to look at what IS getting done and not what is NOT getting done.  Some days I do better at this than others.  Having just turned in a full day of assignments from online classes at 11:00pm I am feeling like I need a reminder that I am moving ahead.

Here is the sculpture beginning:

Armature out of whatever wire I could find, this is an experiment after all!

Fleshing the figure out with foil..

He looks like a newspaper mummy at this point!  Papier Mache is a slow process, but I have fun plans for this piece.  I'll post more when I finish it.

Here is the beginning process of dressing a loom.  I am making a rug which will be a color study in fiber.  

Winding the warp, or the yarns that run lengthwise and are the foundation of the weaving.

These yarns are being strung through the "reed" of the loom in preparation for being threaded into the heddles, or the section of the loom that moves, allowing a pattern to emerge in the finished piece.  I'll post more about it later this week.  

I have gotten work done and am working like crazy to get some finished pieces turned out. I can do this!  

Saturday, October 5, 2013

Guy Kellogg; Cowboy, Farrier and Western Artist


Meet Guy Kellogg, farrier and metal artist of GQ Farrier Services in Cotton City, NM.
Image
Raised in the ranching world in California, New Mexico, Florida, Oklahoma and Wyoming, Guy is at home with horses and cattlemen.  It was only natural that in his creative life he would gravitate to Western Art.  When asked about his inspiration, Guy gets a quizzical look on his face and replies that creating things is a way to relax.  When asked if I could photograph him at work at his anvil, a look of real alarm flashes across his face! Guy is not one to make a fuss.
Image
Snake” Worn out horseshoeing rasp
Guy’s pieces are a natural extension of his work with horses.  A discarded horseshoe can be used for any number of things while an old rasp converts easily to, say, a snake.  Got a spare piece of rope?  No problem, it can be turned into something else too!  This way of thinking comes naturally to Guy.  Making things and trying new ideas in creative ways is how he was raised.  His mother, Dolly Kellogg was a creative woman in her own right.  Raising 9 kids in ranch settings, Dolly was constantly repurposing worn out things, throwing pottery or making costumes.  Creativity is a Kellogg way of life, you don’t have to think about it, you just do it.
Image
Rope Clock
Want to get some cowboy art for yourself?  View Guy's blog at: http://www.kelloggskrafts.blogspot.com or contact Guy via email at gqkellogg@gmail.com but don’t expect to talk about the art world.  Making it is good enough, why talk about it, too?  Now ranch talk? That’s a horse of a different color!
Image
Motorcycle” Rasp and used car parts
Image
Horseshoe Flowers, Table and Chairs” Repurposed horseshoes
Image
Horseshoe Heart” Repurposed horseshoes
Image
Saguaro” Repurposed horseshoes